How to plan and configure resampling
Categories:
Enable timeseries resampling
ClusterCockpit now supports resampling of time series data to a lower frequency. This dramatically improves load times for very large or very long jobs, and we recommend enabling it. Resampling is supported for running as well as for finished jobs.
Note: For running jobs, this currently only works with the newest version of
cc-metric-store. Resampling support for the Prometheus time series database will be added in the future.
Resampling Algorithm
To preserve visual accuracy while reducing data points, ClusterCockpit utilizes the Largest-Triangle-Three-Buckets (LTTB) algorithm.
Standard downsampling methods often fail to represent data accurately:
- Averaging: Tends to smooth out important peaks and valleys, hiding critical performance spikes.
- Decimation (Step sampling): Simply skips points, which can lead to random data loss and missed outliers.
In contrast, LTTB uses a geometric approach to select data points that form the largest triangles effectively. This technique creates a downsampled representation that retains the perceptual shape of the original line graph, ensuring that significant extrema and performance trends remain visible even at lower resolutions.
Configuration
To enable resampling, you must add the following toplevel configuration key:
"resampling": {
  "minimum-points": 300,
  "trigger": 30,
  "resolutions": [
    600,
    300,
    120,
    60
  ]
}
Configuration Parameters
The enable-resampling object is optional. If configured, it enables dynamic downsampling of metric data using the following properties:
minimum-points(Integer) Specifies the minimum number of data points required to trigger resampling. This ensures short jobs are not unnecessarily downsampled.- Example: If
minimum-pointsis set to300and if the native frequency is 60 seconds, resampling will only trigger for jobs longer than 10 hours (300 points * 60 seconds = 18,000 seconds / 3600 = 5 hours).
- Example: If
resolutions(Array [Integer]) An array of target resampling resolutions in seconds.- Example:
[600, 300, 120, 60] - Note: The finest resolution in this list must match the native resolution of your metrics. If you have different native resolutions across your metric configuration, you should use the finest available resolution here. The implementation will automatically fallback to the finest available resolution if an exact match isn’t found.
- Example:
trigger(Integer) Controls the zoom behavior. It specifies the threshold of visible data points required to trigger the next zoom level. When the number of visible points in the plot window drops below this value (due to zooming in), the backend loads the next finer resolution level.
Example view of resampling in graphs
The following examples demonstrate how the configuration above (minimum-points: 300, trigger: 30) affects the visualization of a 16-hour job.
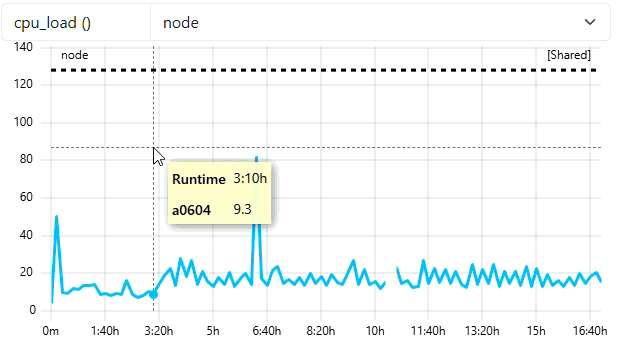
1. Initial Overview (Coarse Resolution)
Because the job duration (~16 hours) requires more than 300 points at native resolution, the system automatically loads the 600s resolution. This provides a fast “overview” load without fetching high-frequency data. You can see in the tooltip of this example that we see datapoints every 10 minutes (because of frequency of 600).
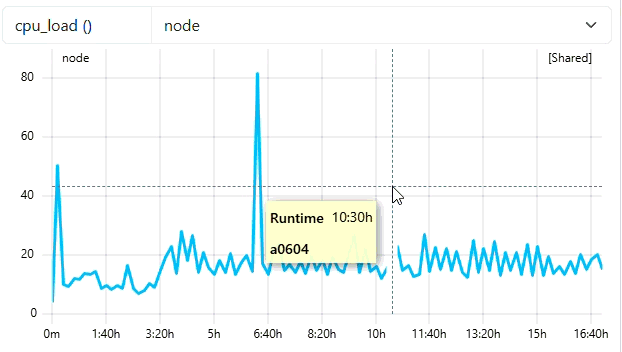
2. Zooming without Triggering
When the user zooms in, the system checks if the number of visible data points in the new view is less than the trigger value (30). In the example below, the zoomed window still contains enough points, so the resolution remains at 600s. As you can see from the tooltip of the example, we still see dataa points every 10 mins.
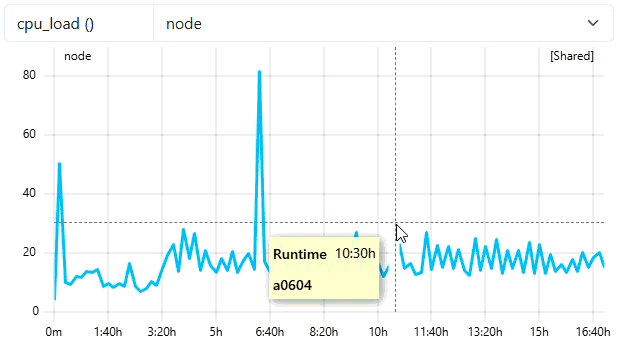
3. Zooming and Triggering Detail
As the user zooms in deeper, the number of visible points drops below the trigger threshold of 30. This signals the backend to fetch the next finer resolution (e.g., 120s or 60s). The graph updates dynamically to show the high-frequency peaks that were previously smoothed out. As you can see from the tooltip of the example, the backend has detected that the selected data points are below trigger threshold and load the second last resampling level with the frequency of 120. With native frequency of 60, a frequency of 120 means 2 mins of data. We will see data points every 2 mins as seen in the tooltip of the example.
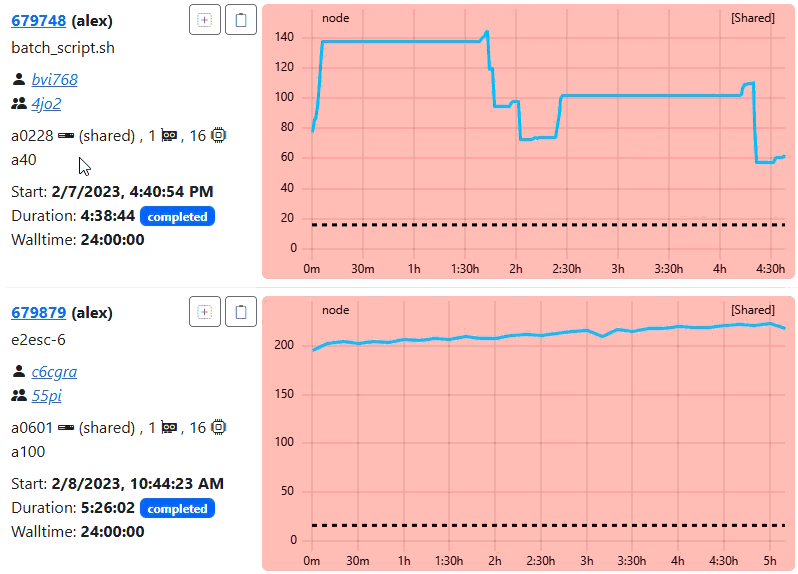
4. Visual Comparison
The animation below highlights the difference in visual density and performance between the raw data and the optimized resampled view. As you know the minimum-points is 300, means resampling will trigger only for jobs > 5 hours of duration (assuming native frequency of 60).
Suggestion on configuring the resampling
Based on the experiments we have done and the performance we have observed, we recommend the reader to:
- configure the
"minimum-points": 900. This means, assuming native frequency of 60, resampling will trigger for jobs > 15 hours of duration. - configure the
"resolutions"with 2 or 3 levels only, with the last level being native frequency. A resampling frequency of 600 is only recommended for jobs > 24 hours of duration.
Feedback
Was this page helpful?
Glad to hear it! Please tell us how we can improve.
Sorry to hear that. Please tell us how we can improve.